Tuesday, December 1, 2015

December 2015 Young Living Promotions


This month in Canada Young Living is loading you up with goodies!  With a 300 PV order you can help Santa out and stuff some stockings with oily goodness!


And, as an additional bonus, for a 150 PV order, you'll get an ADDITIONAL FREE 
Lemon essential oil.


What do you have in your December order?


I am a Young Living Independent Distributor, which means I buy my essential oils at the wholesale price rather than the retail price. I save 24% off retail, receive discounted shipping, and can earn free products through the Essential Rewards program as well as the ability to earn commissions. 

If you would like to become an Independent Distributor, I would love to sponsor you!  You can click HERE and enter 2066298 in the “Sponsor  and Enroller ID” boxes. 
I am always happy to answer any questions!  
Email me at thepureoil@gmail.com


Tuesday, November 24, 2015

DIY gifts: Getting ready for Christmas!

It's ONE MONTH until Christmas Eve!!  Are you EXCITED?  

Okay, maybe I'm the only one who still gets pumped up about a month until Christmas Eve...


Even if you're not getting excited about the coming Christmas festivities, you CAN be excited about having some beautiful, low cost, high appeal gifts ready for the giving as Christmas approaches.  

Around our house we help Santa with the stockings. 
Each of the kids chooses one thing for everyone's stocking, so some things like this that we can make together are a great way to spend some productive time together as things get busy, 
and help the big guy in the red suit!!

Of course my kids go to school too...this means they have teachers.  
Teachers bless them, tend to get all manner of mugs, 
and other stuff that has just GOT to add up over the years!

In my years as a mom with kids in school I've tried to be thoughtuful with our gift giving....meaning mostly that I try to give the teachers CONSUMABLE gifts.  
For a few years we did Epicure Selections dip mixes. Something they can USE UP.  

Now that I'm in love with my essential oils, I'd love to give each teacher something Young Living, but with so many teachers over three children I'm afraid I'd go broke gifting full bottles of oil, 
add to that that many of them wouldn't really understand how to use them, and it's not ideal.

I've come up with a much better option.   
Enter my solution: Pretty DIY EO scented bath salts.

Every teacher on the planet can use a good relaxing soak.
...for that matter, so can every mom...but I digress.
(make extra and keep a stash for yourself too!)

These are super simple, look fantastic with the addition of pink Himalayan crystal salt stripes and can be customized to any scent you have.  


I'm betting that if I went to a bath and body shop a gift like this would run over $5.00 easily....plus it would be full of nasty synthetic fragrances that do nothing to help you stay healthy.


I have estimated that this gift runs me in the realm of $1.00 to $2.00 depending on the cost of salt, and what jars I buy. That leaves some room for adding some chocolate, a Tim Card for a cuppa or whatever else the kids think Mr. or Mrs. Soandso would like this Christmas.

You can save even more $$ by referring to this post, or you can simply follow these directions when you're using an oil that is not approaching an empty bottle.

HOW TO MAKE IT

1 cup coarse sea salt (as pictured, but you could use epsom salts as an alternative)
A few drops of essential oil(s) of choice. (I used Christmas Spirit for this, about 6 drops)
1/3 cup coarse pink Himalayan salts 


To a glass bowl add the sea salt/epsom salts and blend in 5-10 drops of essential oil of your choice with a spoon until completely blended.  
(Please be aware that if you are using a really hot oil such as cinnamon or clove just a few drops 1-3 will do, and you will need to dilute the EO in a carrier oil before adding to the salts.  I suggest diluting a 1-3 drops of hot EO in a teaspoon of carrier oil before adding to the salts.)

Holding your jar on an angle, spoon in just a bit of the white salt blended with the essential oil, 
so it collects in one corner.

On top of this layer spoon in some pink salts to show around the outer edge of the jar.  

Layer in some more white, and some more pink in the same fashion, until the jar is full to the very top.  You don't want space in the jar, or the salt will shift and your layers will be lost. 

Put the lid on tightly and apply a pretty label on the top. 

If you have raffia, ribbon, or a pretty country Christmas fabric, tear a strip and tie around the lid. 


Directions are to dump the whole bottle (this size is a 250 mL jam jar) into the bath while water is running.  Soak for a minimum of 20 minutes.  

This recipe will make two of these jars with a wee bit left over.

Great oil choices for scent would be Christmas Spirit, Clove (you would only need a few drops), Peppermint (1-2 drops) or Spearmint, Cinnamon (again, only need a few drops).
Bare in mind that Peppermint is a cooling oil, so even in a hot bath, if you add more than a drop or two it can leave you feeling chilled.  
Dispersing the oils in the salt does help lessen this effect, in my experience.

 Thieves is a fantastic blend for this, it smells like Christmas to me, and  It's one I use in bath salts regularly throughout the winter, but it requires dilution in a carrier oil before going into the salts.


I am a Young Living Independent Distributor, which means I buy my essential oils at the wholesale price rather than the retail price. I save 24% off retail, receive discounted shipping, and can earn free products through the Essential Rewards program as well as the ability to earn commissions. 

If you would like to become an Independent Distributor, I would love to sponsor you!  You can click HERE and enter 2066298 in the “Sponsor  and Enroller ID” boxes. 
I am always happy to answer any questions!  
Email me at thepureoil@gmail.com

Monday, November 23, 2015

Using your Ginger Bug to make Switchel

I have affectionately named my Ginger Bug "Ginger" (okay, so I'm not that imaginative!) 
If you don't know what the heck a Ginger Bug is, check that out HERE.

If you're familiar with the Ginger Bug, or even have one of your own, you might be just about ready to brew up some fantastic tasting and fizzy Switchel (or Swizzle if you prefer). 


Here's what you'll need:


And this is the delightfully fizzy drink you will get to sip in just about 24 to 48 hours if the conditions are right!


Make sure that your ginger bug is good and active before you decant some off to make the Switchel!


Okay, ready for my recipe?


Fizzy Swizzle/Switchel    (I kind of like the sound of fizzy swizzle)

In a quart sized canning jar combine the following: 

1/2 cup active ginger bug* 
2 tbsp raw apple cider vinegar
3 tbsp raw local honey
3 1/2 to 4 cups of water (to fill the jar)
1-2 drops of sole** (pronounced so-lay)


*You can strain your ginger bug first, but I used some of the ginger along with the liquid to make for a faster ferment.  This means you will have to strain the switchel before serving, but it does ferment faster with the ginger in, rather than just the liquid.  Learn about the bug HERE.

** The sole is to provide minerals for the yeast to grow and produce all those bubbles.  If you don't have sole, you could put the tiniest pinch of Himalayan pink salt into the mix, but I highly recommend making yourself some sole.  A post to come soon on that!

Seal the jar tightly and shake to combine all ingredients and help dissolve the honey.  Then sit your tightly sealed jar in a nice cozy place for 24-48 hours.  You'll know it's ready because you'll start to see some bubbly action at the top.  I just pour it through a strainer into a glass after chilling it once it's done.  

To see everything Wellness Mama has to say about Switchel, and for her recipe, see her blog HERE.

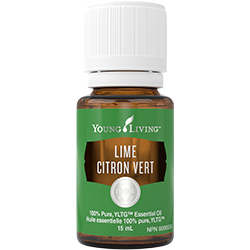
I do really enjoy her un-fizzy Switchel too, but I haven't tried it with the lime.  I wonder if a drop of this:

would be good in her recipe, since I don't have any limes around just now.  

I think I'm going to go find out!

Will you try Switchel?


I am a Young Living Independent Distributor, which means I buy my essential oils at the wholesale price rather than the retail price. I save 24% off retail, receive discounted shipping, and can earn free products through the Essential Rewards program as well as the ability to earn commissions. 

If you would like to become an Independent Distributor, I would love to sponsor you!  You can click HERE and enter 2066298 in the “Sponsor  and Enroller ID” boxes. 
I am always happy to answer any questions!  
Email me at thepureoil@gmail.com

Sunday, November 22, 2015

What on Earth is a Ginger Bug?

For sometime now I have been working at making a good Kombucha brew and it's been a bit of a long haul. So now that I know about the GINGER BUG, I'm wondering why I have slaved over a SCOBY for almost year with only mediocre results.

I'm not saying you should forget about Kombucha.  Absolutely not! I am finally getting the hang of it, and I will continue to make and experiment with that for sure.

Rather, I'm saying if you don't have access to a SCOBY, or are daunted by the week or more long process of making booch, or if you're trying and trying and not happy with the finished product, take heart!  This seems as close to a no-fail fermentation starter that I've found. All of the ingredients are readily available, I think almost anwhere.


So, what is a Ginger Bug anyway?  

It's a mixutre of water, sugar and fresh ginger.  That's really it.

For a pint size jar, (2 cups volume) you put 3 tablespoons of grated fresh raw ginger into the jar, (use organic if you can find it, and don't peel it.  The yeasty bugs live on the skin, and they're the workers here!) add some water (about a cup), add 1/2 cup of sugar (she says use plain white, but I used raw cane sugar), and then stir to dissolve the sugar.  I fill to the neck with more water and gently stir. I then covered it with the canning jar ring over a coffee filter to keep any buggy bugs out of there.

You have to feed the culture every day with a tablespoon more of sugar and a tablespoon more of fresh ginger.   In all honesty, don't fret if you forget a day, just pick up where you left off.  Of course if you find mould, you need to lay this Ginger Bug to rest, and get to work on a new one.

I think the reason mine started working so quickly is that I put it on the floor near a heating vent, and the furnace is on.

Please, head over to Wellness Mama where I learned about the Ginger Bug, and learn from her like I did.   Her post is HERE.


Some more pics of my Ginger Bug while she's 'growing up'.  Is it silly to name her Ginger?


Look at all those yummy bubbles!


This isn't a great picture, but I'm telling you, Ginger is ready to go make some fizzy drinks!


Time to make some Switchel (or Swizzle if you prefer)!

Wellness Mama also has a recipe for home made gingerale, and that's next on my honey-do list for Ginger. :)


I will do a post soon about the way I made my Switchel, because it differs from the way Katie at Wellness Mama makes hers.   I'll link up then!

I am a Young Living Independent Distributor, which means I buy my essential oils at the wholesale price rather than the retail price. I save 24% off retail, receive discounted shipping, and can earn free products through the Essential Rewards program as well as the ability to earn commissions. 

If you would like to become an Independent Distributor, I would love to sponsor you!  You can click HERE and enter 2066298 in the “Sponsor  and Enroller ID” boxes. 
I am always happy to answer any questions!  
Email me at thepureoil@gmail.com

Saturday, November 21, 2015

How to keep mantle greenery fresher for longer

First, I'll share a quick before and after of our fireplace, because I'm so darn pleased with our new mantle!  (which really isn't new.  My wonderful Daddy made it for me over a year ago.  I developed the plans, and  he made it perfectly!  It has sat on the bedroom floor against the wall for over a year...but that's a whole other story!)

In any case, here's the sad before photo...


And here's what it looks like now, all gussied up for Christmas!


A close up of the lovely beam mantle.  
It's made of 1x10x4" boards that cost me less than $4 each at Home Depot.
It took 4 boards in total, plus a few hinges, so it opens on small hinges at the top.  
It will hold the seasonal decor that will go on top of it throughout the year. 
This is a double duty mantle. :0)
Thanks Daddy!!


This was my problem.   I was so excited to have this lovely mock farmhouse beam mantle (which even holds all of its out of season decorations inside!!!), that I went out to the back yard...and the front yard, and gathered some fresh cedar, and blue spruce.  

I can't obviously have the boughs in water when they're laying on the mantle, and I don't particularly want to disassemble this every few days to a week and re-do the whole thing.  
Plus, I might kill my cedars if I have to do that.  


So, I came up with this!


It's fantastic, because it even stores right inside the mantle, and I remember to spray it at least 2-3 times a day.  Plus it smells amazing every time I mist!

You could certainly use any number of essential oils to scent this however you like. You truly only need a drop to a few drops of each.   When this bottle runs out, I might try clove or peppermint rather than the nutmeg and mix it up throughout the season.  
If I had a glass bottle, I'd blend in some citrus oils, or go with Christmas Spirit or even Thieves.

I have a plastic bottle now though, so citrus is out as long as I'm using that.  

I'm at about 5 days in now, and they are still lovely and fresh, not dropping any needles at all.  I do expect I'll have to change them at least once before Christmas, but I'll put it off as long as I can.


For this particular blend (which I love!) I used the following:

1 drop each of  Cedarwood, Nutmeg and Idaho Blue Spruce
and 2 drops each of Cypress and Balsam Fir.

The bottle holds about a scant cup of water.  

I did consider adding about a half teaspoon of glycerin, and if this doesn't keep the greens fresh as long as I'd like, I'll add that next time.  For now, the blend is super simple: water and a selection of festive essential oils.  It smells fantastic and is a great way to 'diffuse' without a diffuser even!

Do you bring fresh greens in at Christmas that can't be watered?  
How do you keep them fresh as long as possible?


I am a Young Living Independent Distributor, which means I buy my essential oils at the wholesale price rather than the retail price. I save 24% off retail, receive discounted shipping, and can earn free products through the Essential Rewards program as well as the ability to earn commissions. 

If you would like to become an Independent Distributor, I would love to sponsor you!  You can click HERE and enter 2066298 in the “Sponsor  and Enroller ID” boxes. 
I am always happy to answer any questions!  
Email me at thepureoil@gmail.com


Friday, November 13, 2015

Diffuse or soak!

This is another blend I'm enjoying the scent of.  


3 drops Christmas Spirit
1 drop Peppermint
2 drops Orange

You can add the above to your diffuser and turn on for a lovely smell throughout the house.
OR
Add to a cup of sea salt, or epsom salts.  Blend well and add to bath.  
Soak at least 20 minutes


Enjoy!


I am a Young Living Independent Distributor, which means I buy my essential oils at the wholesale price rather than the retail price. I save 24% off retail, receive discounted shipping, and can earn free products through the Essential Rewards program as well as the ability to earn commissions. 

If you would like to become an Independent Distributor, I would love to sponsor you!  You can click HERE and enter 2066298 in the “Sponsor  and Enroller ID” boxes. 
I am always happy to answer any questions!  
Email me at thepureoil@gmail.com

Monday, November 9, 2015

Don't waste your egg shells

These girls work hard to make the delicious eggs that my family and I eat, so I don't want to waste even the shells.  Besides, egg shells are so versatile, why would I want to waste them?


It's a tough job foraging, sun-bathing, clucking and walking around all day!


First of all, what exactly are egg shells anyway?

    Eggshell is made almost entirely of calcium carbonate (CaCO3) crystals. It is a semipermeable membrane, which means that air and moisture can pass through its pores. The shell also has a thin outermost coating called the bloom or cuticle that helps keep out bacteria and dust.

    Science of Eggs: Anatomy of an Egg | Exploratorium

    https://www.exploratorium.edu/cooking/eggs/eggcomposition.html

Take a look at this site for loads of great information on the value of egg shells!


An excerpt from this site: 
One whole medium sized eggshell makes about one teaspoon of powder, which yields about 750 - 800 mgs of elemental* calcium plus other microelements, i.e. magnesium, boron, copper, iron, manganese, molybdenum, sulphur, silicon, zinc, etc. There are 27 elements in total. The composition of an eggshell is very similar to that of our bones and teeth.
*Elemental amounts are the amounts absorbable.


There are many ways I use egg shells, so I keep all of them.  
As soon as I'm done with my eggs (the insides), I rinse out all the shells and leave them to air dry.   If they're going to be smashed up for the garden or my plants, I don't always bake them, but if they're going to be used for cosmetics then I make sure they are put in a low temperature oven (about 170-200 degrees) for about 15 to 20 minutes to dry them out completely and dis-infect them further.


I have this cute little marble mortar and pestle. I put the broken and clean dry shells in there and smash them up!  Once they easily fit into the bowl of the mortar I use a circular motion with good pressure to get them more finely ground.


At this stage I consider them about perfect for going into planters either in the house or garden.  
They are fantastic if you have a slug or snail problem as they deter these critters from crawling across the earth to get to the plants.  If they can't get on the plants, they can't eat them!  As it rains (outside) or as you water the plants inside the water will slowly carry the calcium from the shells through to the soil and therefore the roots.  Tomato plants especially love this treatment.  

Another way to draw the calcium from them for plants is to soak them in water for a long time, and use that water for the plants.  I have dropped egg shells in the rain barrel, and then in the fall just dump it all out into the garden and turn the dirt over to complete the composting process. 

Of course, if you're a composter, then I'm sure your shells make it to the compost heap anyway.

Next spring I intend to start a few seedlings in clean dry egg shells too!  Add a tablespoon or two of potting mix to half a shell, and plant the seed.  The whole mess can go into the ground, and they look super cute in the house while sprouting!


Now on to the really fun uses!  
Since egg shells are essentially Calcium Carbonate they are a FREE source of calcium, and can be great for skin care!


Some people even ingest the finely ground powder, and I might even try that in a capsule form.
Take a look at THIS SITE, for some great information on the health benefits of egg shells!


Now as for cosmetic uses, take a look at this AWESOME BLOG for a Mario Badescu knock off recipe for Silver Powder.  
I've made it myself and it's a recipe I will make again when I run out.  
My spin on her silver powder knock off is that I add a diluted drop of Melrose Essential oil blend (or sometimes Frankincense) to the cotton ball before applying to the face, and I use colloidal silver to wet the cotton ball too.  This really makes it a 'silver' powder, and gives it an acne fighting boost ;)

To make the powder fine enough for such a purpose, you will need to use a high powered blender.   This means saving egg shells for a while to have enough to properly blend.  
Marie uses a coffee grinder for hers I think, and that's a fantastic option if you don't have enough shells to make a blender go work.


Last but not least, I have heard of soaking sterilized egg shells in ACV (preferably home made) to extract calcium and produce a 'calcium citrate' which can be used as you would regular ACV.  

I have also personally tossed some finely ground shells on my nylon scrubber when trying to get stubborn burned on food off of my stainless steel or cast iron cookware.  
It would not be safe on Teflon, though I don't consider Teflon a safe cooking surface anyway.  
If it could kill a pet bird in the house, why would I want to cook for my family on it?

Please chime in and share how you use egg shells if you do.
If you didn't before, will you try some of these ways of recycling them?


I am a Young Living Independent Distributor, which means I buy my essential oils at the wholesale price rather than the retail price. I save 24% off retail, receive discounted shipping, and can earn free products through the Essential Rewards program as well as the ability to earn commissions. 

If you would like to become an Independent Distributor, I would love to sponsor you!  You can click HERE and enter 2066298 in the “Sponsor  and Enroller ID” boxes. 
I am always happy to answer any questions!  
Email me at thepureoil@gmail.com

Saturday, November 7, 2015

Front Door Decor From Yard Waste?


A quick post today about using what you have, and making the most of it. :)

Here in Southern Ontario this week we had a few absolutely beautiful weather days that broke records for high temps in November.  Naturally I had to get out to the yard to play clean up and get ready for the snow to fly.

I was clipping back a rogue grape vine that was threatening to take over a rose of sharon, and removing some low corkscrew willow branches that have been whacking me in the face every time I walk throught the gate, and then I got to thinking.

I don't like sending all this stuff out to the curb.  Isn't this really the exact materials that I pay big bucks for at Michaels?  How silly!

One of the grape vines I clipped came with a lovely cluster of grapes attached and I decided to see about making it into a fall wreath for our front door.  

I simply twisted and wrapped the vine, and willow branches together.  
There isn't any wire at all, no glue, nothing.
It's all from the back yard, and was all destined for yard waste, but look at how pretty it is!


I did clip a few bits from a cedar shrub as well as a boxwood, and they are just tucked right in.  
The grape cluster is still attached as it grew on the vine.  

I even added a few drops of essential oils to the vine, just for fun.
Now when people come my door they can snack on organic red grapes, and smell balsam fir.

I challenge you, if you have a yard, to do a bit of clean-up this weekend and see what you can come up with for absolutely FREE!


I am a Young Living Independent Distributor, which means I buy my essential oils at the wholesale price rather than the retail price. I save 24% off retail, receive discounted shipping, and can earn free products through the Essential Rewards program as well as the ability to earn commissions. 

If you would like to become an Independent Distributor, I would love to sponsor you!  You can click HERE and enter 2066298 in the “Sponsor  and Enroller ID” boxes. 
I am always happy to answer any questions!  
Email me at thepureoil@gmail.com


Friday, November 6, 2015

Using essential oils effectively in the kitchen, and a recipe for a savory blend


This time of year I love getting back to making hearty meals for my family and cooking with the oven and crock pot again. 

One of the things I've really loved since getting started with Young Living Essential Oils is that I can use them to season food, because many of them are safe for ingestion.

 I will caution you that if you are using drug-store or health food store available essential oils, please DO NOT use them in your meals.  They are not pure enough to be safe for ingestion!  Brands sold at health food stores and drug stores are generally labelled NOT SAFE for internal use, and that is with good reason.  

Unless you know the brand you are using is GRAS (Generally regarded as safe) for consumption, please just enjoy the scent, as you would any air freshener. 

Now, since I know my  oils are safe to take internally, I immediately started experimenting with them in the kitchen...with not the greatest of results if I'm being totally honest.
It was a colossal disappointment in the beginning.  


You must remember when working with essential oils that they are potent almost beyond imagination.  It took me a few failed attempts to accept this fact, and then I realized that this was actually GREAT news!  


I came up with a very dilute (read COST EFFECTIVE) blend that is an exceptional flavouring when used in savory dishes!  Because you only use a few drops of each essential oil in the blend, and it makes 15 mL of oil (approximately 300 drops) which is used by the drop to flavour your meals,
it's super cheap!
That's my kind of cooking!!!


You can use any kind of cooking oil you prefer to use in your kitchen as the base, or  carrier oil for the blend.  I decided to go with Liquid Coconut Oil only because we're heading into winter here in Ontario, and my kitchen gets chilly.  The EVOO that I might have selected for this use will get too thick for it to easily drip out of the bottles drop reducer, and I don't want to be bothered with a warm water bath before using each time.

If you're in a warmer climate, I'd probably go with Extra Virgin Olive Oil as the base.


I have yet to make a pretty little label, but this is the only unlabelled bottle on my shelf, and the scent identifies it.  :)  I will put a little label on though, in the event the boys will want to use it when they make their eggs. 

This is very flexible, and can totally be tailored to the flavors you are most partial to.  


Want my recipe?


Here's what's in my little bottle of home cookin' savory oil:


In a 15 mL re-purposed essential oil bottle I added the following:
5 drops Rosemary EO
4 drops Basil EO
3 drops Thyme EO
2 drops Marjoram EO
1 drop Oregano EO
1 drop Taste of Italy blend EO (this was a promotional oil I got free months ago, but it's heavy on the oregano again, so if you don't have it, you could do two drops of Oregano instead)


Top up the bottle with your choice of carrier oil and shake well.  Allow it to sit for a day or two before using for best results.  This blend will keep indefinitely if you keep it in a coolish and darker place.  I find it is excellent for use in soups, stews, gravies, pasta dishes, with cabbage rolls, or any ground meat dishes, and even salad dressings!  


(my bottle was a YL Lemon essential oil bottle, all cleaned up and well dried in the oven to ensure there was no water droplets left inside)

Give oils a try in your kitchen, and let me know how they work for you!


I am a Young Living Independent Distributor, which means I buy my essential oils at the wholesale price rather than the retail price. I save 24% off retail, receive discounted shipping, and can earn free products through the Essential Rewards program as well as the ability to earn commissions. 

If you would like to become an Independent Distributor, I would love to sponsor you!  You can click HERE and enter 2066298 in the “Sponsor  and Enroller ID” boxes. 
I am always happy to answer any questions!  
Email me at thepureoil@gmail.com

Wednesday, November 4, 2015

Who came first; the chicken, or the egg?


I'll be honest up front.  I have no idea who came first.  My hypothesis is that the chicken came first, but I really can't prove it. If it was the egg, then who cared for it to be able to develop and hatch into the chicken?  AND, 50% of eggs will hatch into ROOSTERS...which raises a whole other issue!  My stance on the issue is that a chicken and a rooster came first.  Otherwise things just don't add up according to my math.

Anyway, regardless of how the whole thing got started, look at this array of eggs I found in nest boxes at the farm, all within a few days of each other!  Am I the only one who gets excited about finding perfect eggs of all different sizes?  (Don't tell me if I am.  It's like Easter morning every time I go out and collect eggs.  Who knew the Easter Bunny works all year?)


Dont' they just make you smile?


Here they are, all lined up pretty.  
Do you want to see what was inside them?


The largest two were double yolkers.  

They made some lovely Gluten Free "Huffs Puffs"
I will have to do a post with that recipe on My Gluten Free Blog


I didn't crack open the regular sized one, because I didn't have a need for it this day. 

You can see the super dark yolk in the peewee egg.  
It could be that this was a pullet's first egg. 
(So exciting!)


Want to see a close up of the double yolks?


My lighting left a bit to be desired.  These yolks were lovely and dark and rich.  

Absolutely delicious huffs puffs I tell you!


And how about a look at the wee fairy egg up close?


When I cook up these eggs I will often use a drop of my savory essential oil blend that I keep in the kitchen.  It's a well diluted blend, and I'll have that recipe up in the next day or two. 
It is linked up HERE.

I'd also like to add that because these are free range eggs, and the best I've found, nothing goes to waste!  I wash out the shells, dry them in the oven and crush them.  Then they get stored in a canning jar and used a variety of ways.  Post to come next week!

What to do with egg shells?  Click HERE.

I hope you enjoyed my egg-stravaganza here. 
(sooo cheesy, sorry!)


I am a Young Living Independent Distributor, which means I buy my essential oils at the wholesale price rather than the retail price. I save 24% off retail, receive discounted shipping, and can earn free products through the Essential Rewards program as well as the ability to earn commissions. 

If you would like to become an Independent Distributor, I would love to sponsor you!  You can click HERE and enter 2066298 in the “Sponsor  and Enroller ID” boxes. 
I am always happy to answer any questions!  
Email me at thepureoil@gmail.com


Tuesday, November 3, 2015

Farm life

I have a little story to tell today.

Funny things happen when you climb out from under your rock and take a risk.

(As an aside, my daughter is big into the "And Then It Happened" series of books right now...hence my story telling style today!)

We are very blessed in our neighbourhood to have a very old homestead turned very urban small-scale farm, known as the Tilt Farm by locals, and frequented often for the purchase of fresh free range eggs sold on an honour system out of a fridge at the end of their driveway.  For years I had purchased the best eggs ever from this farm, and one day I was able to speak to the farmer, and was invited to bring kitchen scraps for the chickens and toss them over the fence.  Well, colour me a happy girl!  Now I had a reason to go more than once every week or two!  It was so much fun to toss our food waste, mostly fruit and veggie peels and stale breads over the fence and see these pretty girls so happy!


I just can't be miserable when I'm in the presence of chickens.


Fast forward about a year or two.  I noticed they had some cute little white fluffs back in a separate fenced area.  I asked about them and was told they were raising a few turkeys as well.  They had 10.

One Tuesday night in mid to late August, just before dusk I stopped by to toss our kitchen scraps over the fence for the girls, but to my surprise they had all gone in for the night already.  I had noticed the last few weeks there were fewer turkeys, and I saw the lady of the farm out to tuck in the girls, and I asked her about the turkeys.  She told me they had had difficulty with the turkeys, and that they had lost 4 of 10 and two of them were very sick now, and they were afraid they were beyond saving at this point.

And then it happened....my mouth opened to say I'd be back with the food for the chickens in the morning, so it wouldn't attract predators through the night; but it didn't stop there.  Without really thinking through how I might come across to this lovely farm lady, I went on to explain that I am a nurse, and I have recently been learning a lot about natural health care options, and especially energy medicine and essential oils.  I went so far as to ask if I could come the next day and see the sick turkeys and try some techniques that had recently worked so well for my own pets at home.

I have to give Mrs. Nancy Tilt all the credit in the world for grace under fire.  She must have thought I was crazy, since she didn't know me, and here I was asking to do what probably sounded to her like voodoo with her turkeys!   She graciously agreed to see me the next day if I decided to come by, and probably went to bed scratching her head and wondering what the heck she'd just gotten herself into.

I scurried home and got to work.  I had my sister look up some avian information for me in Dr. Melissa Shelton's Animal Desk Reference.  I WILL own this book, one day soon! (in fact, I'm working on becoming an affiliate)

I made up the avian raindrop oil blend, as well as a feather spray.  The next day I trucked over to the farm, introduced myself as the crazy lady from the night before, and she only somewhat reluctantly took me out to see the birds.

Let me just say, I made it clear I've never worked with turkeys (at least not the kind with feathers haha!) before in my life, and I really didn't know how this would work out.  If they really believed they were going to lose these two birds, I would be happy to do my best for them, and we'd just have to see what would happen.  She had come around to the idea of just trying anything, and set me up with a place to store my oil concoctions in her garage so I could come anytime to see them. It's hard to do worse than dead, so there was really nothing to lose at this point.

I started working with them on Wednesday morning.  I came twice a day.  The first time she helped me catch the turkeys for the treatment, and after that I was on my own.  But you know what?  It didn't take very long before both turkey and nurse were really looking forward to the time together, and catching the turkeys ceased to be a problem. Sadly on the Friday I missed the morning 'appointment', and we were in a horrible heat wave.  By the time I got there in the evening, one of them had passed.  I resolved not to give up, even though the other sick one was really, very poorly.  I also knew I couldn't miss a visit in that heat.


Here is my 'turkey girl' (forever known only as turkey girl, only because I had named the other one Sasha and then she died the next day.  I wasn't going to jinx turkey girl too!)    :(

You can see she has a congenital deformity of the right foot.  This made it really difficult for her to get around as she grew, so as she got bigger and had a harder time moving around, I often had to carry her in and out of the turkey house.  We grew very close, this beautiful turkey girl and I.

I understood the purpose of this mission was to get her well enough to feed people on Christmas day.  A year ago, I wouldn't have believed that I'd do this myself.  But here I was, nursing a turkey so she could fill her life's purpose.  But let me tell you something.  She lived WAY beyond her life's purpose.  This turkey girl here taught me more in the few months I worked with her before she went to the happy farm in the sky, than I could have learned in a hundred years without her.  No one at the farm could believe that she survived and was well for slaughter.  In all honesty, I think it was the worst mission accomplished of my life thus far.  But I'm processing it, and the experience has left me a much better person, and certainly more appreciative of the meals I feed my family.  I prepare them with more love and reverence for the animals who lived their lives so that I could feed my family.

In a day and age when we are so far removed from the food that we eat, I have learned so much, not only about farming, but about myself too.  In my time at the farm, I also learned how to care for the chickens, and I especially love collecting the eggs.

I will have a post soon with pictures of some eggs of various sizes, inside and out. :)  Link HERE

I am a Young Living Independent Distributor, which means I buy my essential oils at the wholesale price rather than the retail price. I save 24% off retail, receive discounted shipping, and can earn free products through the Essential Rewards program as well as the ability to earn commissions. 

If you would like to become an Independent Distributor, I would love to sponsor you!  You can click HERE and enter 2066298 in the “Sponsor  and Enroller ID” boxes. 
I am always happy to answer any questions!  
Email me at thepureoil@gmail.com